How to Fix Baseboards with Wood Filler – Damaged baseboards can make an otherwise beautiful room look neglected. Chips, dents, nail holes, scratches, and small cracks are common problems, especially in high-traffic areas. The good news is that you don’t always need to replace the trim.
If you’re wondering how to fix baseboards with wood filler, you’re in the right place. With a few affordable tools and the right technique, you can restore your baseboards to look almost brand new. Whether your trim is solid wood or MDF, this guide will walk you through every step while helping you avoid common mistakes.
Let’s get started.
Why Wood Filler Is Great for Baseboard Repairs
Wood filler is designed to repair minor surface damage on wood and wood-like materials. Once it dries, it can be sanded, primed, and painted to blend seamlessly with the surrounding trim.
Wood filler works well for repairing:
- Small dents
- Chipped corners
- Nail holes
- Minor cracks
- Gouges
- Surface imperfections
However, it’s important to know its limits before starting.
Tools and Materials You’ll Need
Gather everything before beginning.
| Tool or Material | Purpose |
|---|---|
| Wood filler | Repairs holes and chips |
| Putty knife | Applies filler smoothly |
| Sandpaper (120 & 220 grit) | Levels the repair |
| Utility knife | Removes loose material |
| Damp cloth | Cleans dust |
| Primer | Seals repaired area |
| Paint | Matches existing baseboards |
| Painter’s tape | Protects nearby surfaces |
For deeper damage, you may also want a Baseboard Repair Kit, which often includes fillers, applicators, sanding pads, and touch-up tools.
How to Fix Baseboards with Wood Filler Step by Step
Step 1: Clean the Damaged Area
Remove dust, dirt, peeling paint, and loose wood fibers.
A clean surface helps the filler bond properly and creates a stronger repair.
Step 2: Remove Loose Material
If the damage has splintered edges, trim them away carefully with a utility knife.
Avoid leaving loose fibers underneath the filler.
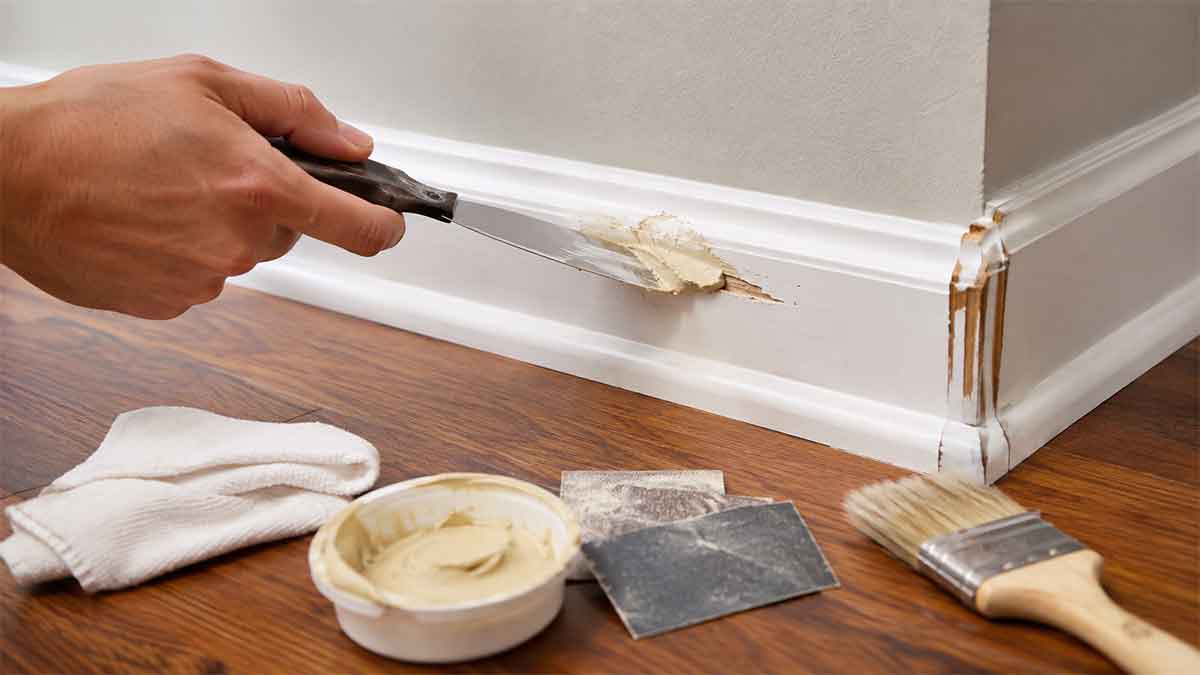
Step 3: Apply the Wood Filler
Using a putty knife, press the filler firmly into the damaged area.
Slightly overfill the hole because most fillers shrink a little as they dry.
Work in multiple thin layers instead of one thick layer if the damage is deep.
Step 4: Let It Dry Completely
Drying times vary by manufacturer.
Most fillers dry within:
- Small repairs: 15–30 minutes
- Medium repairs: 1 hour
- Large repairs: Several hours
Always follow the instructions on the product label.
Step 5: Sand Until Smooth
Start with 120-grit sandpaper to level the repair.
Finish with 220-grit for a smooth surface that blends perfectly into the surrounding baseboard.
Run your fingers over the repair. If you can’t feel the transition, you’re ready for paint.
Step 6: Prime the Repair
Primer helps hide the filler and ensures even paint coverage.
Skipping primer often leaves dull patches after painting.
Step 7: Paint the Baseboard
Use matching trim paint with a small angled brush.
Two thin coats usually provide the best finish.
Best Wood Filler for Baseboards
Not every filler performs equally well. Here are several trusted options.
| Product | Best For |
|---|---|
| Minwax High Performance Wood Filler | Large repairs |
| DAP Plastic Wood | Everyday repairs |
| Elmer’s Carpenter’s Wood Filler | Small dents and nail holes |
| FamoWood Original | Fast drying |
| Bondo Wood Filler | Deep structural damage |
Is Bondo Wood Filler Good for Baseboards?
Yes.
Bondo wood filler is one of the strongest repair products available. Unlike standard wood fillers, it uses a two-part formula that cures extremely hard.
It’s ideal for:
- Missing corners
- Deep gouges
- Large broken sections
- High-impact areas
The downside is that it dries quickly, so you’ll need to work fast.
Can I Use Wood Filler to Fix Baseboards?
Absolutely.
Wood filler is one of the best products for repairing cosmetic damage on baseboards.
It’s especially effective for:
- Nail holes
- Pet scratches
- Furniture dents
- Minor cracks
- Chipped paint with missing wood underneath
Just remember that wood filler is not meant to repair loose or moving trim.
When Should You Not Use Wood Filler?
Wood filler isn’t the solution for every problem.
Avoid using it when:
- The baseboard is rotting.
- Water damage has weakened the wood.
- The trim is loose from the wall.
- Large pieces are missing.
- The damage affects structural strength.
In these situations, replacing the damaged section usually produces longer-lasting results.
How Big of a Gap Can I Fill with Wood Filler?
A good rule is:
- Up to 1/4 inch: Standard wood filler works well.
- 1/4 to 1/2 inch: Build the repair in multiple layers.
- Larger than 1/2 inch: Use epoxy, Bondo, or replace the damaged section.
Large repairs filled with ordinary wood filler alone may crack over time.
Should I Use Wood Filler or Caulk for Baseboards?
This is one of the most common questions homeowners ask.
| Use Wood Filler | Use Caulk |
|---|---|
| Chips | Wall gaps |
| Nail holes | Trim-to-wall seams |
| Gouges | Small movement joints |
| Missing wood | Paintable expansion gaps |
Here’s an easy way to remember it:
Wood filler repairs wood. Caulk seals gaps.
If your baseboard has separated slightly from the wall, caulk—not wood filler—is usually the correct choice.
How to Repair Baseboard Water Damage
Water damage requires extra attention.
Minor Water Damage
If the wood is still solid:
- Dry the area completely.
- Remove loose paint.
- Sand away damaged fibers.
- Fill shallow depressions.
- Prime with a stain-blocking primer.
- Repaint.
Severe Water Damage
If the baseboard feels soft or swollen, replacement is often the better solution.
Wood filler cannot restore wood that has begun to rot.
How to Fix Baseboards Pulling Away from the Wall
If the trim has separated from the wall, don’t simply fill the gap with wood filler.
Instead:
- Locate wall studs.
- Reattach the baseboard using finish nails.
- Fill nail holes with wood filler.
- Apply paintable caulk along the top edge.
- Repaint.
This creates a much stronger and cleaner repair.
How to Fix Corners on Baseboards
Corners receive frequent impacts from vacuums, shoes, toys, and furniture.
For small corner chips:
- Remove loose pieces.
- Apply filler slightly proud of the surface.
- Shape it with the putty knife.
- Let it cure.
- Sand until the original profile returns.
For missing corners larger than one inch, Bondo wood filler usually provides better durability than standard filler.
How to Repair a Chipped Baseboard
Small chips are among the easiest repairs.
Simply:
- Clean the damaged spot.
- Fill the chip.
- Allow it to dry.
- Sand smooth.
- Prime.
- Paint.
Once painted, the repair is often nearly invisible.
Related: How to Fix Drywall Tape Bubbles
How to Fix MDF Baseboard
MDF baseboards require slightly different treatment.
Because MDF absorbs moisture easily:
- Avoid water-based cleaning before repair.
- Remove loose fibers carefully.
- Apply filler in thin layers.
- Sand gently.
- Prime thoroughly before painting.
If the MDF has swollen significantly from water exposure, replacement is usually the best option.
Common Mistakes to Avoid
Many DIY repairs fail because of a few avoidable mistakes.
Avoid these common errors:
- Applying filler over dust.
- Using one thick layer.
- Sanding before the filler dries.
- Skipping primer.
- Using wood filler instead of caulk for wall gaps.
- Ignoring water damage.
Taking a little extra time usually produces professional-looking results.
Tips for Nearly Invisible Repairs
Want your repair to disappear?
Follow these professional tips:
- Choose a high-quality filler.
- Slightly overfill every repair.
- Sand with progressively finer grits.
- Prime before painting.
- Feather paint into the surrounding trim.
- Use matching sheen (semi-gloss is common for baseboards).
These small details make a noticeable difference.
Related: How to Fix a Bad Mud Job on Painted Drywall Without Starting Over
FAQ
Can I paint directly over wood filler?
Yes, but it’s best to apply primer first. Primer creates an even surface and helps the paint blend with the surrounding baseboard.
How long should wood filler dry before sanding?
Most products can be sanded within 30 minutes to an hour for small repairs, but deeper fills may require several hours. Always follow the manufacturer’s drying recommendations.
Can wood filler fix cracked baseboards?
Yes, if the crack is cosmetic and the baseboard is still stable. Structural cracks or loose trim should be repaired or replaced before filling.
Is wood filler strong enough for corners?
For small chips, yes. For large missing corners or heavy-impact areas, a two-part product like Bondo is usually more durable.
Can I repair painted baseboards without replacing them?
Absolutely. Most chips, dents, nail holes, and shallow gouges can be repaired using wood filler, then sanded, primed, and repainted for a like-new appearance.
Related: How to Fix Crack in Drywall From Settling Without Making It Worse
Conclusion
Learning how to fix baseboards with wood filler is one of the easiest and most rewarding DIY home improvement projects. Small chips, dents, nail holes, and surface cracks can often be repaired in under an hour with just a few inexpensive tools.
The key is using the right product for the type of damage. Wood filler works beautifully for cosmetic repairs, while caulk is best for wall gaps and Bondo is a better choice for larger missing sections. By preparing the surface carefully, applying filler correctly, and finishing with primer and paint, you can achieve results that look professional without replacing your baseboards.
If your baseboards are showing signs of wear, don’t wait for the damage to get worse. Pick up a quality wood filler, follow the steps in this guide, and give your trim a fresh, clean look that lasts for years.